In this video you will discover Why I Eat The Same Food Everyday on a 1 Meal a Day Diet To Lose Weight and Get Ripped!
And if you really can’t control yourself It actually can be anything you want for that one meal.
Checkout some of the goodies on our yummy craving list below.
For premium Slay Fitness artisan supplements CLICK HERE
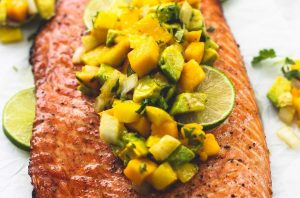
Chicken in coconut mango verde sauce

* 1 tablespoon olive oil * 1 1/2 pounds chicken breasts cut into 1/8” slices against the grain* * 1 red bell pepper sliced then chopped into 2” pieces * 1 green bell pepper sliced then chopped into 2” pieces COCONUT MANGO VERDE SAUCE * 1 13.5 oz. can coconut milk (I like Chaokoh) * 1 cup mild salsa verde (I like Herdez in the jar) * 1 cup roughly chopped mango (or 1 cup jarred mango, drained) * 1 jalapeno, seeded, deveined * 3-5 tablespoons brown sugar ** * 2 tablespoons lime juice * 1 teaspoon ground cumin * 1/2 teaspoon chili powder * 1/2 teaspoon smoked paprika * 1/2 teaspoon salt * Sriracha/Asian hot chili sauce to taste (optional) GARNISH * chopped cilantro DEETS * Add all of the Coconut Mango Verde Sauce ingredients to your blender and blend until smooth. Set aside. * Heat oil over medium high heat in large nonstick skillet until very hot. Add chicken and cook just until most pieces are no longer pink then add bell peppers and continue to cook for 2 minutes. * Stir in Coconut Mango Verde Sauce and cook just until chicken is completely cooked and sauce is heated through. Taste and add additional brown sugar for sweeter, Sriracha for spicier or lime for tangier. Garnish with optional fresh cilantro. Serve with rice.
White chocolate raspberry cake
WHITE CAKE * 1 1/2 cups milk at room temperature** * 9 large egg whites at room temperature** * 1 1/2 teaspoons vanilla extract * 1 teaspoon almond extract * 3 1/3 cups cake flour (see notes for substitution) * 2 2/3 cups granulated sugar * 2 tablespoons baking powder * 1 1/2 teaspoons salt * 18 tablespoons (2 ¼ sticks) unsalted butter, cubed small, softened RASPBERRY FILLING * 16 ounces frozen thawed raspberries or very ripe fresh raspberries * 2 1/2 tablespoons cornstarch * 2 1/2 tablespoons lemon juice * 2/3 cup granulated sugar WHITE CHOCOLATE CREAM CHEESE FROSING * 12 ounces white baking chocolate, chopped small * 1/4 cup heavy cream * 2 8 ounce pkgs. cream cheese (16 ounces) at room temperature *** * 1/2 cup unsalted butter at room temperature *** * ¼ teaspoon salt, plus more to taste * 2 teaspoons vanilla extract * 7 cups powdered sugar, more or less as needed WHITE CAKE * Preheat oven to 350 degrees F. Prepare three 9-inch cake pans by lining the bottoms with parchment paper then spraying the entire inside of the pans with nonstick cooking spray WITH FLOUR (or grease and flour pans). If you only have 2 pans, bake 2 cakes then bake the third cake immediately after. * In a large liquid measuring cup or medium bowl, whisk together the milk, egg whites, and extracts. Set aside. * Mix cake flour, sugar, baking powder, and salt in the bowl of electric mixer fitted with the whisk attachment at low speed. With the mixer still running, add the butter a few pieces at time. Increase speed to medium and continue to mix until the mixture resembles moist crumbs and the largest pieces are the size of small peas, about 3 minutes. * Pour in half of the milk mixture and mix on medium-high until light and fluffy, about 1 minute. Stop the mixer and scrape down the bowl. With the mixer on low, stream in the remaining milk mixture. Mix on medium-low no longer than 30 seconds. If the batter looks a little lumpy, resist the urge to over-mix! Instead, stop the mixer and give it a few stirs by hand. * Divide batter evenly between the three prepared cake pans. Bake at 350 degrees F until a toothpick inserted in the center comes out with a few crumbs and has no wet batter clinging to it, about for 22-25 minutes. Let the cakes rest in pans for 5 minutes then turn out onto cooling racks to cool completely before frosting, about 1 ½ hours. Meanwhile, you can make the raspberry filling and frosting. RASPBERRY FILLING (SEE NOTES FOR STORE-BOUGHT) * Add raspberries to a food processor and puree. Place a fine mesh sieve over a medium saucepan and add the raspberry puree to discard seeds. Press down on the puree with the back of a spoon or spatula, until only seeds remain. Take care to wipe the back of your sieve to get all of the puree. * Whisk cornstarch, sugar and lemon juice into the puree until cornstarch is mostly dissolved. Bring to a simmer over medium-high heat, stirring constantly, then reduce heat to medium (medium-low if your stove runs hot) and continue to cook and stir continuously until puree is thickened. It needs to be quite thick but spreadable so the cake layers don't slide around. Refrigerate until completely chilled. WHITE CHOCOLATE CREAM CHEESE FROSTING * Add chopped white chocolate and heavy cream to a microwave safe bowl. Microwave for 30 seconds, stir, then continue to microwave at 15 second intervals, stirring in between, until chocolate is completely smooth; set aside to cool for 5 minutes. * Beat cream cheese, butter and salt at medium speed in a large bowl with a hand-held electric mixer until very creamy, 1-2 minutes. Beat in white chocolate and vanilla until smooth. * Gradually add powdered sugar in batches, beating at low speed until blended after each addition. The frosting should be on the thick side to stand up against the cake layers. If the frosting is too thin, add additional powdered sugar or refrigerate for 30 minutes or so. If it’s too thin, beat in heavy cream, 1 teaspoon at a time to reach desired consistency. * Spoon roughly 1 cup frosting into pastry bag (to use to pipe the dams of frosting). If you don't have a freezer bag, snip 1 corner of a freezer bag to make a small hole, set aside. Spoon ¾ cup frosting into a small bowl to use to create the crumb coat ("Crumb Coat Frosting"); set aside. ASSEMBLE * Once the cakes are completely cooled, use a large serrated knife to remove the domes from the top of the cakes so that they’re flat. * Place four strips of parchment paper around the edges of a platter or cake stand to create a square with an open space in the middle (to keep cake stand clean). Place a small dollop of frosting in the center of the cake stand/plate to keep the cake from moving, then top with one cake, top side up. * Pipe a ring of frosting just inside the top edge of cake. Add half of the chilled Raspberry Filling and spread it to the edges of the piped frosting. Add 1 cup White Chocolate Frosting and spread to the edges of the cake. * Top with the second leveled cake, top side down. Repeat procedure with piping/filling/frosting. Top with third cake, top side down. FROST CAKE * Create a crumb coat by frosting the cake using the reserved Crumb Coat Frosting starting with the top and working down until the cake is evenly, thinly frosted, removing any excess frosting. Refrigerate cake for 30 minutes or until the crumb layer has set. Meanwhile, refrigerate remaining frosting and lightly beat again before using. * Frost the outside of cake as you desire with the remaining frosting. Remove parchment paper then pipe a ring of frosting around the bottom of the cake. Garnish with raspberries if desired. BAKING TIPS FOR SUCCESS * Use the correct size pan: You will need three 9-inch cake pans for this recipe. I have not tried this recipe with 8-inch cake pans, but the batter should fit, the white cakes will just take longer to bake, closer to 27-30 minutes, and be thicker. * Cake Four: You may substitute the cake flour with 3 cups all-purpose flour plus ⅓ cup + 1 tablespoon cornstarch. * White chocolate: Use quality chocolate baking bars such as Bakers or Ghirardelli for the best results. Quality chocolate chips can also work but ONLY use Guittard or Ghirardelli. Other chocolate brands don’t have enough cocoa butter and too many additives so they will not melt well. Note: weigh the chocolate chips and don’t use a measuring cup – it does not translate. * **Room temperature ingredients: It is essential that you use room temperature egg whites, milk and butter for this recipe or your cake will not rise properly or be as light and tender. To quickly bring eggs to room temperature, add eggs (in shells) to a bowl of warm water (not hot) and let sit for 20 minutes. You can microwave the milk at 15 second intervals to warm, but only warm to room temperature- not hot or it will scramble the egg whites! * Raspberry filling consistency: The raspberry filling should be chick and barely spreadable so that it stays in place and doesn’t run over the edges, otherwise, you’ll have cake layers sliding all over the place! If the jam thickens too much, microwave it for 10 seconds. * Store-bought raspberry jam: You’ll need about 1 ⅓ cups seedless raspberry jam. Use 2/3 cup per layer. If your store-bought jam is too hard to spread, microwave it for 10 seconds. * ***Frosting: This frosting should be on the thicker side and not a thin icing so it’s thick enough to stand up against the weight of the cake layers. To achieve a thick frosting without having to add too much powdered sugar, use cream cheese and butter softened at room temperature. I made sure there is plenty of frosting – so don’t be shy! The frosted cake should have about ½ cup leftover which you can use to decorate the cake if you wish. MAKE AHEAD You can make the cake entirely ahead of time, or in stages, here’s how: * Raspberry Jam: Make the raspberry jam and store in an airtight container in the refrigerator for 48 hours. You may need to microwave for 10 seconds to loosen it a little, just so it’s thick but spreadable – you do NOT want it runny! * Frosting: Is best freshly made, but you can whip it together up to 24 hours before assembling the cake, tightly cover and refrigerate. Let it come close to room temperature before re-whipping. * Cakes: The white cake layers can be prepared one day in advance. Let the layers cool completely then wrap each layer tightly in plastic wrap and store at room temperature. * Crumb Coated Cake: Tightly wrap the cake in plastic wrap and refrigerate or freeze after you apply the crumb coating. * Frosted Cake: Assemble the entire cake, cover with a cake cover or tent with foil, refrigerate, then let sit at room temperature for 1-2 hours before serving. HOW TO STORE The assembled and frosted cake should be covered with a cake cover or foil and refrigerated. It will stay fresh for up to 2 days, but may be stored for up to 4 days. Bring the cake to room temperature before serving. HOW TO FREEZE * To freeze individual cake layers: Tightly wrap the individual cake layers in plastic wrap and freeze for up to three months. * To freeze crumb coated cake: Tightly wrap in a couple layers of plastic wrap followed by a couple layers of foil, freeze for up to two months. * To freeze frosted cake: Tightly wrap in a couple layers of plastic wrap followed by a couple layers of foil, freeze for up to two months. Allow the cake to thaw overnight in the refrigerator then unwrap and come to room temperature on the counter for 1-2 hours before serving.
Firecracker shrimp
SHRIMP * 1 ½ pounds raw extra-large shrimp (16-20 ct), peeled and deveined, tails left intact * 1/3 cup flour * 1 tsp EACH salt, garlic powder, ground ginger * 1/2 teaspoon pepper * 3 large eggs * 2 cups panko bread crumbs * Canola oil or vegetable if pan frying or deep frying FIRECRACKER SAUCE * 3/4 cup Asian sweet chili sauce (like Mae Ploy) * 3 tablespoons reduced sodium soy sauce * 2 tablespoon red wine vinegar * 1 tablespoon honey * 1 tablespoon Asian chili sauce (like Sambal Oelek), more or less to taste IF BAKING * Preheat oven to 425 degrees F. Add panko to a large baking sheet and toss with ¼ cup canola oil until evenly moistened. Spread panko into an even layer. (You may also spray with cooking spray instead of oil, see notes). Bake at 425 degrees F for about 5-7 minutes, or until golden, stirring half way through cooking. Keep an eye on the panko the last few minutes so it doesn’t burn. BREAD SHRIMP * Breading stations: In a shallow dish, whisk the flour, garlic powder, ground ginger, salt and pepper together. In a second shallow dish, whisk the eggs together. In a third shallow dish, add the panko. To receive the breaded shrimp: Line the counter next to the stove with parchment paper or if baking, top two baking sheets with wire racks and spray with cooking spray. * To bread the shrimp: Use one hand for dredging the shrimp in the flour and panko and one hand for the egg. Working with a few shrimp at a time, dredge them in flour mixture, followed by the eggs, letting excess drip off, followed by the panko. Press the panko firmly into the shrimp so it adheres. Transfer shrimp to the prepared parchment paper or wire racks. COOK (PICK ONE) * To deep fry: Pour enough oil into a heavy large pot to reach depth of 1 ¼ inches; heat to 350 degrees F. Working in batches, fry shrimp until golden and cooked through, about 2 minutes. Using a spider strainer, transfer shrimp to paper towels in a single layer. Bring oil back to 350 degrees F between batches. * To shallow pan fry: Heat 3-4 tablespoons canola or vegetable oil in a large sauté nonstick skillet over medium-high heat. Working in batches, add the shrimp to the pan in a single layer. Cook the shrimp for 1-2 minutes per side, or until golden brown and cooked through. Using tongs, transfer shrimp to paper towels in a single layer. Wipe out pan as needed in between batches and repeat. * To air fry: Preheat air fryer to 400 degrees F. Spray the shrimp with cooking oil and add to the air fryer in a single layer (you’ll need to work in batches). Cook for 8-10 minutes, flipping halfway through. For extra crispy shrimp, spray the shrimp again after flipping. Transfer shrimp to paper towels in a single layer. * To bake: Space the shrimp evenly apart on the racks so they aren't touching. Bake at 425 degrees F 7 to 9 minutes, or until cooked through. COMBINE WITH SAUCE * The last few minutes the shrimp is cooking, whisk all of the Sauce ingredients together in a large saucepan. Adjust the heat as desired with more or less chili sauce. Bring to a simmer until warmed through. * When ready to serve, add the cooked shrimp and toss to coat. Garnish with green onions if desired and serve immediately. EXPERT TIPS * Shrimp: Feel free to use frozen shrimp, thaw first. * Panko breadcrumbs: Panko is a Japanese breadcrumb sold in every grocery store (including Walmart) usually next to the other breadcrumbs. It is the secret behind the CRUNCH in this recipe, so please don’t skip! * Asian Sweet Chili Sauce: This popular condiment should be easy to find in the Asian section of your grocery store. It is sometimes labeled “Thai Sweet Chili Sauce.” Please do not confuse it with Asian Chili sauce/paste without the “sweet” – or your mouth will be on fire! * Asian Chili Sauce: This is different from Asian Sweet Chili Sauce – there is no sweet about it! I use Sambal Oelek with the green lid but you can also use your favorite chili sauce such as Sriracha or even Buffalo Wings Hot Sauce. * Add vegetables: Reduce the shrimp to 1 pound and include stir fry vegetables such as bite size broccoli florets, thinly sliced carrots or bell peppers chopped into 1-inch pieces. Stir fry the vegetables over medium high heat until crisp tender, about 3 minutes, and then add the sauce. * Gluten free: Use your favorite gluten free flour, tamari instead of soy sauce, gluten free panko such as Aleia’s Gluten-Free Panko and double check that your Asian Sweet Chili Sauce is gluten free (Mae Ploy and Thai Kitchen brands are). * Egg-free: Cooks Illustrated recommends using heavy cream instead. * To bake without wire racks: Line baking sheets with lightly greased foil and place in the oven to get nice and hot while you bread the shrimp. Take care when adding panko shrimp because your pans will be HOT! * Meal Prep: The panko can be toasted ahead of time and you can also completely bread the shrimp ahead of time. Spread breaded shrimp on a parchment paper lined baking sheet. Cover with foil and refrigerate. Uncover and let stand for 30 minutes at room temperature before cooking. Note: this method will produce ever so slightly less crispy shrimp if baking. HOW TO STORE AND REHEAT This Firecracker Shrimp is best enjoyed fresh once tossed with the sauce because the breading softens upon refrigeration. I suggest reheating the shrimp in the oven or air fryer to revive the crispy texture. The microwave will warm the shrimp but won’t improve the texture. * Storage: Store the shrimp in an airtight container in the refrigerator for up to 3 days. For best results, let the shrimp cool completely before storing. * Air fryer: Place shrimp in a single layer in the basket without touching, air fry for 3-4 minutes, until crispy and warmed through. * Oven: Spread shrimp on a lightly greased baking rack set in a baking sheet. Bake at 400 degrees for 5-8 minutes, or until heated through. * Microwave: Microwave for 30 seconds, then in additional increments of 10 seconds as needed.