Ah, cravings. We’ve all had them. They strike fast and hard. Before you know it, you’ve downed handfuls of potato chips or half a dozen chocolate chip cookies. Not the best reaction for weight loss.
But contrary to popular belief, you can control your food cravings. Try these tips, and you’ll begin giving in less often when those cravings hit.
Confront the thought of the food directly.
Make a reasonable decision. Ask yourself whether you really must have the food that’s popped into your mind? Making statements such as, “I know I’m not hungry, I don’t have to eat a food every time I think of it” or “Each time I think about a food and do not eat it, it will become easier” can help. (Also try asking yourself these 4 questions before you eat.)
Substitute your food thought with another thought.
Replace food images with other thoughts or images (like how you’ll look after your weight loss, compliments you recently received, etc.). Thinking of alternative images will work better than trying to stop particular food cravings. (Check out these adorable animal pics for a sweet distraction!)
Distract yourself.
Engaging in activities that keep your hands busy is particularly helpful in controlling your food cravings and aiding your weight loss. Some ideas: writing a letter, doing chores around the house, calling a friend, brushing your teeth, taking a bath, or taking a walk.
Make a plan to give in.
Set a specific place and time and how you’ll fit the food into your daily and weekly plan. This will allow you to look forward to eating the food rather than eating it randomly and feeling guilty for doing so later.
Purchase it in small quantities.
Have the food but limit the quantity (for instance, buy a single serving of cookies, which may have four cookies to a pack rather than a dozen) to decrease the chance of overeating.
Eat it with others.
If you’re concerned that you may overeat the food you’re craving, and you normally eat more reasonable amounts when you’re around other people, eat it in front of others, especially those who support your weight loss efforts. (Dining solo? Here are 7 ways to keep from overeating.)
Assess your situation.
If you crave a cupcake because you haven’t eaten for a while and you just saw a cupcake commercial on TV, you’re better off eating something nutritious first, and then determining whether you need to have the cupcake.
Cheat days are great for curbing cravings. Here are some great recipes below from Carl’s bad cravings.
Source Prevention
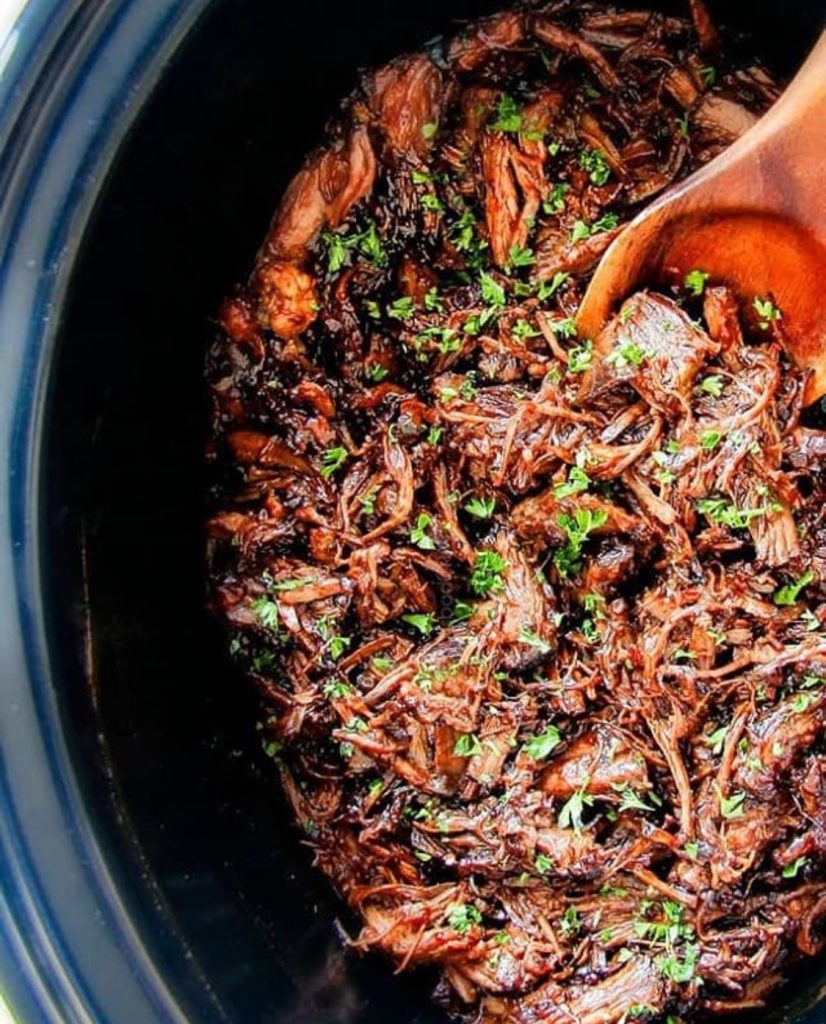
Honey Balsamic Beef
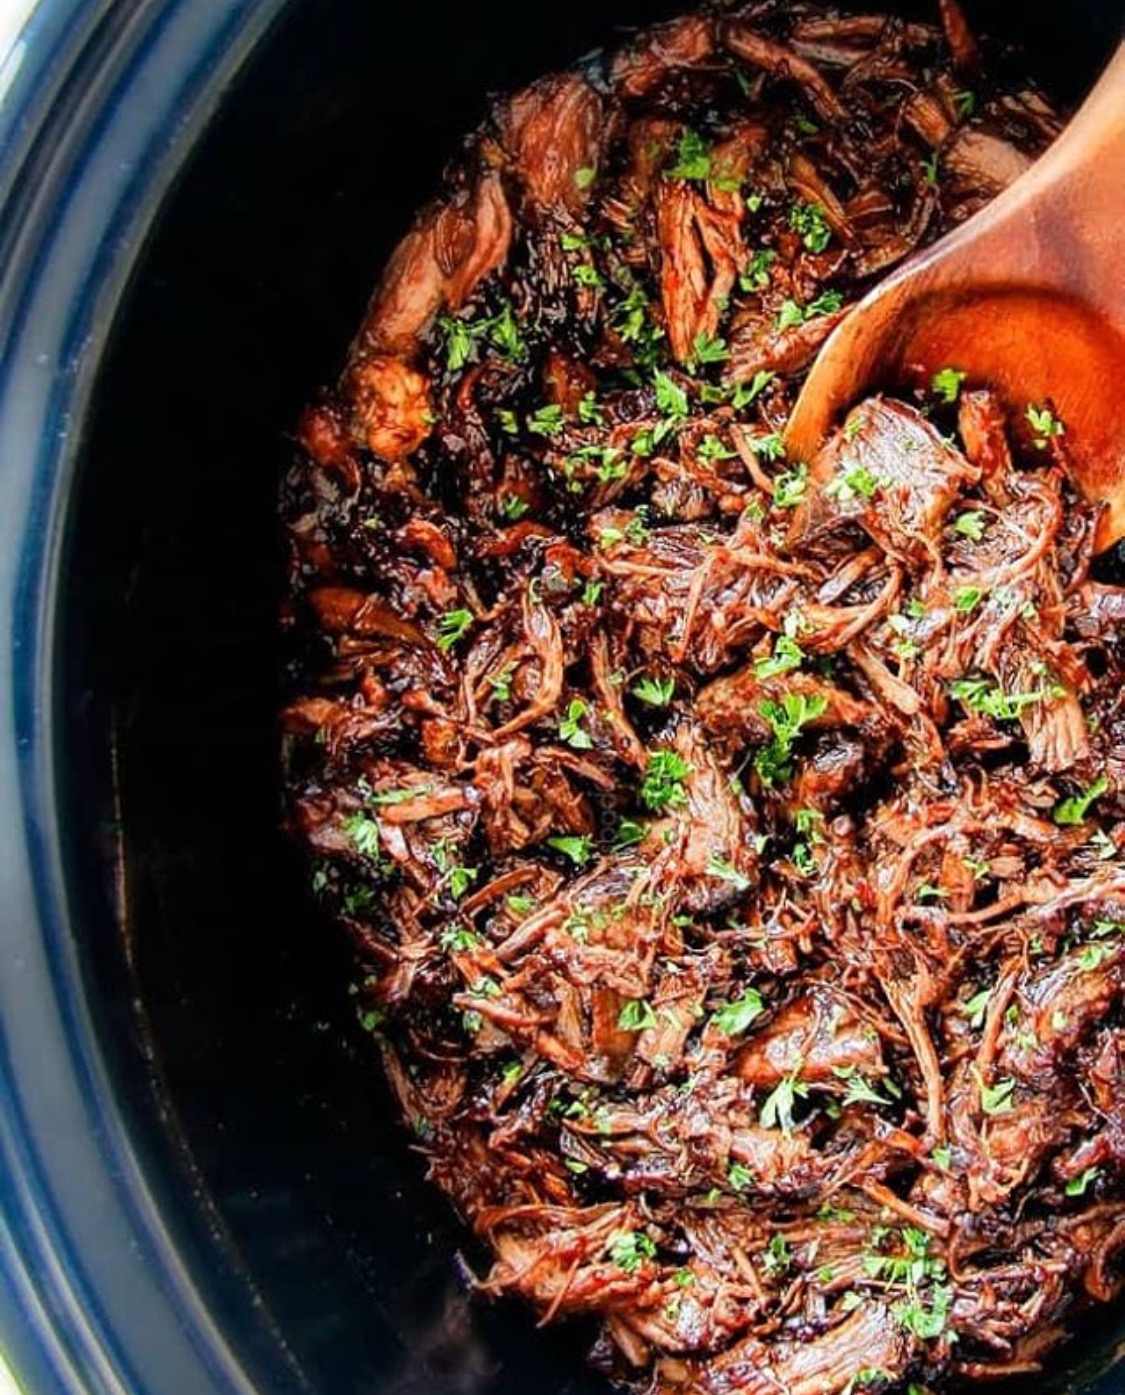
Slightly sweet, deliciously tangy, and irresistibly fork-tender, this Slow Cooker Honey Balsamic Beef from @carlsbadcravings is quickly becoming one of our favorite finds. 1. Heat olive oil over medium high heat in a large nonstick skillet. Using two forks or tongs to hold roast, sear on all sides until lightly browned. Add to slow cooker and top with all remaining ingredients. 2. Cook on LOW for 7 hours or until fall apart tender. 3. Remove roast to a cutting board and add all remaining slow cooker liquid to a large saute pan/skillet with sides (NOT a small saucepan). Simmer 25-30 minutes OR until thickened. It will thicken very quickly the last few minutes so watch closely towards the end. 4. Meanwhile, shred roast beef and add back to slow cooker. Stir in desired amount of thickened sauce. 5. Serve as sandwich filling or with rice, potatoes, etc. ⠀ ⠀
Rich, buttery, tender PINK LEMONADE POUND CAKE
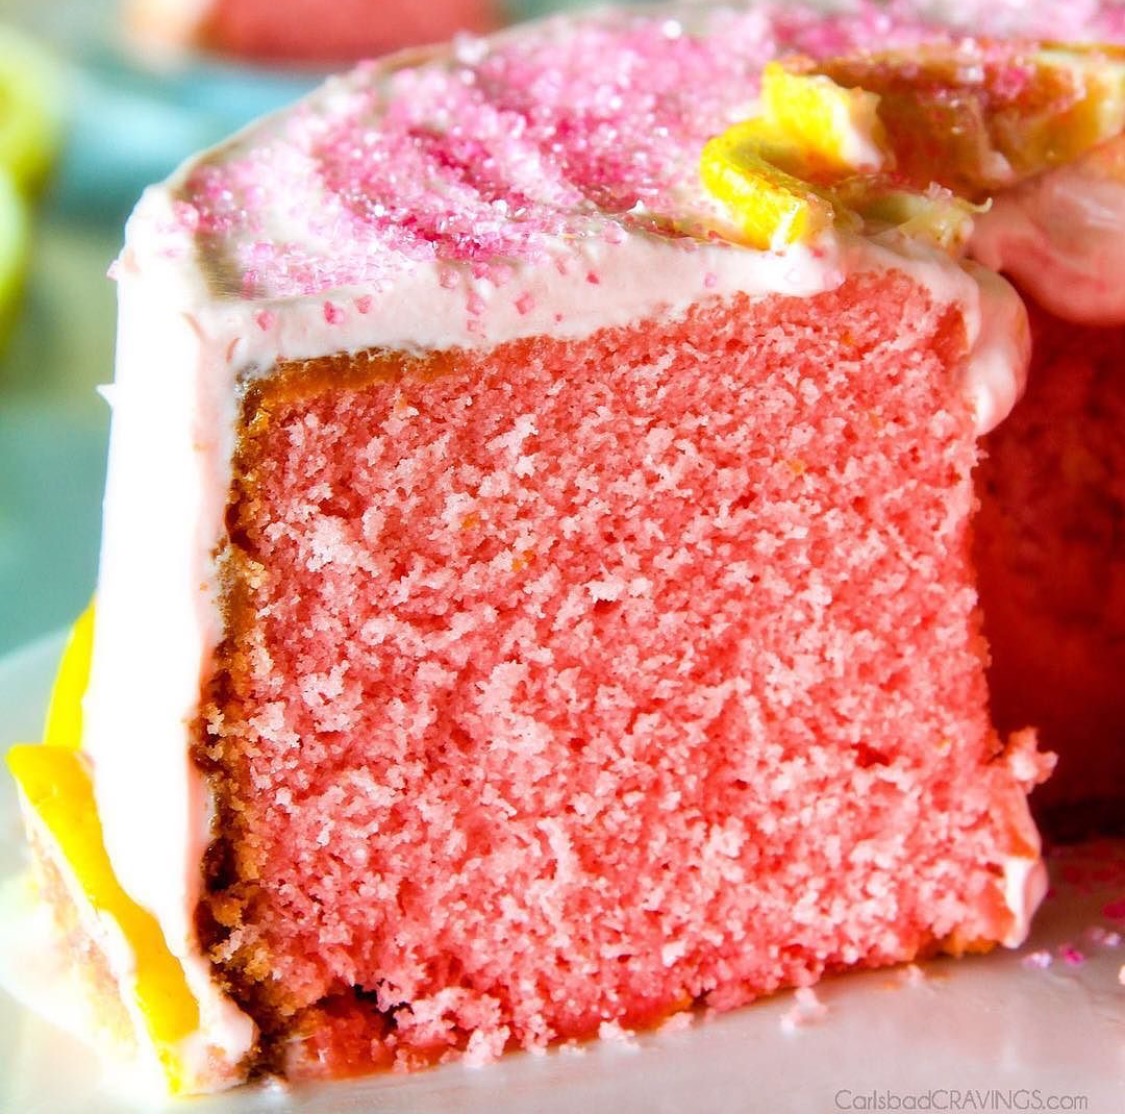
This Rich, buttery, tender PINK LEMONADE POUND CAKE smothered with delectable tangy Lemon Buttercream frosting is wonderfully delicious and perfect for birthday parties and baby showers Pink Lemonade Pound Cake * 3 cups all-purpose flour * 1/2 teaspoon salt * 1/4 teaspoon baking soda * 3 cups granulated sugar * 1 cup butter, softened * 15 drops red food coloring * 5 large eggs at room temperature * 1/2 cup full fat sour cream at room temperature * 2 teaspoons vanilla extract * 3/4 cup milk at room temperature * 1/4 cup lemon juice Candied Lemon Slices (optional) * 1 cup sugar, divided * 3/4 cup water * 2 large lemons, halved lengthwise, then sliced into 1/4” thick slices * Pink sprinkles Lemonade Frosting * 8 tablespoons unsalted butter softened** * 2 cups Powdered sugar * 8 oz. cream cheese cut into 8 pieces softened** * 3 tablespoons lemon juice * 1 1/2 teaspoons vanilla extract * 4 drops red food coloring or more if desired 1. Preheat oven to 325 degrees F and generously spray all surfaces of a 16 cup nonstick tube pan with nonstick cooking spray WITH FLOUR*, OR grease and flour the inside. Set aside. 2. Sift the 3 cups of flour, baking soda and salt into a medium bowl and set aside. 3. Beat the butter until creamy then add sugar and beat until fluffy, scraping sides down as needed, about 7 minutes (beating the full 7 minutes results in a fluffier cake). Add food coloring and mix until combined. Add eggs, one at a time, beating until just the yellow disappears after each egg. Stir in sour cream and vanilla extract just until combined. 4. Mix milk and lemon juice together. 5. With mixer running on low, gradually add flour mixture to butter mixture in thirds, alternately with milk/lemon juice mixture in between each third. Beat on low until just combined. 6. Spoon batter into prepared pan, smooth top and tap pan on counter a few times to release air bubbles. 7. Bake until a wood pick inserted near the center of cake comes out clean, 80 – 90 minutes, taking care not to overbake (overbaked cakes are not as moist). 8. Let cake cool in pan for 20 minutes then remove from pan, and let cool completely on a wire rack. Candied Lemon Slices 1. Combine 3/4 cup sugar and water in small saucepan over medium heat. Whisk constantly until sugar dissolves. Add lemon slices and bring to a simmer for 15 seconds. Remove from heat and let sugar and lemon slices cool completely, about 45 minutes. 2. Transfer lemon slices to wire rack to drain, about 5 minutes. Sprinkle both sides with remaining sugar. Generously sprinkle top sides with pink sprinkles. Lemonade Frosting 1. Beat butter and sugar with handled mixer at medium-high speed until light and fluffy, about 2 minutes. Add cream cheese, 1 piece at a time, beating thoroughly after each addition. 2. Add lemon juice, vanilla and red food coloring and beat to combine. 3. Evenly spread frosting over top and sides of cake. Sprinkle with pink sprinkles and place lemon slices along bottom edge of cake (optional). *You need to use a 16 cup tube pan for this recipe. A bundt cake pan will NOT work in this recipe because it does not have enough volume. **Let cream cheese and butter soften at room temperature. Do NOT soften in microwave or frosting will be runny.
CRANBERRY PISTACHIO CHEESE LOG
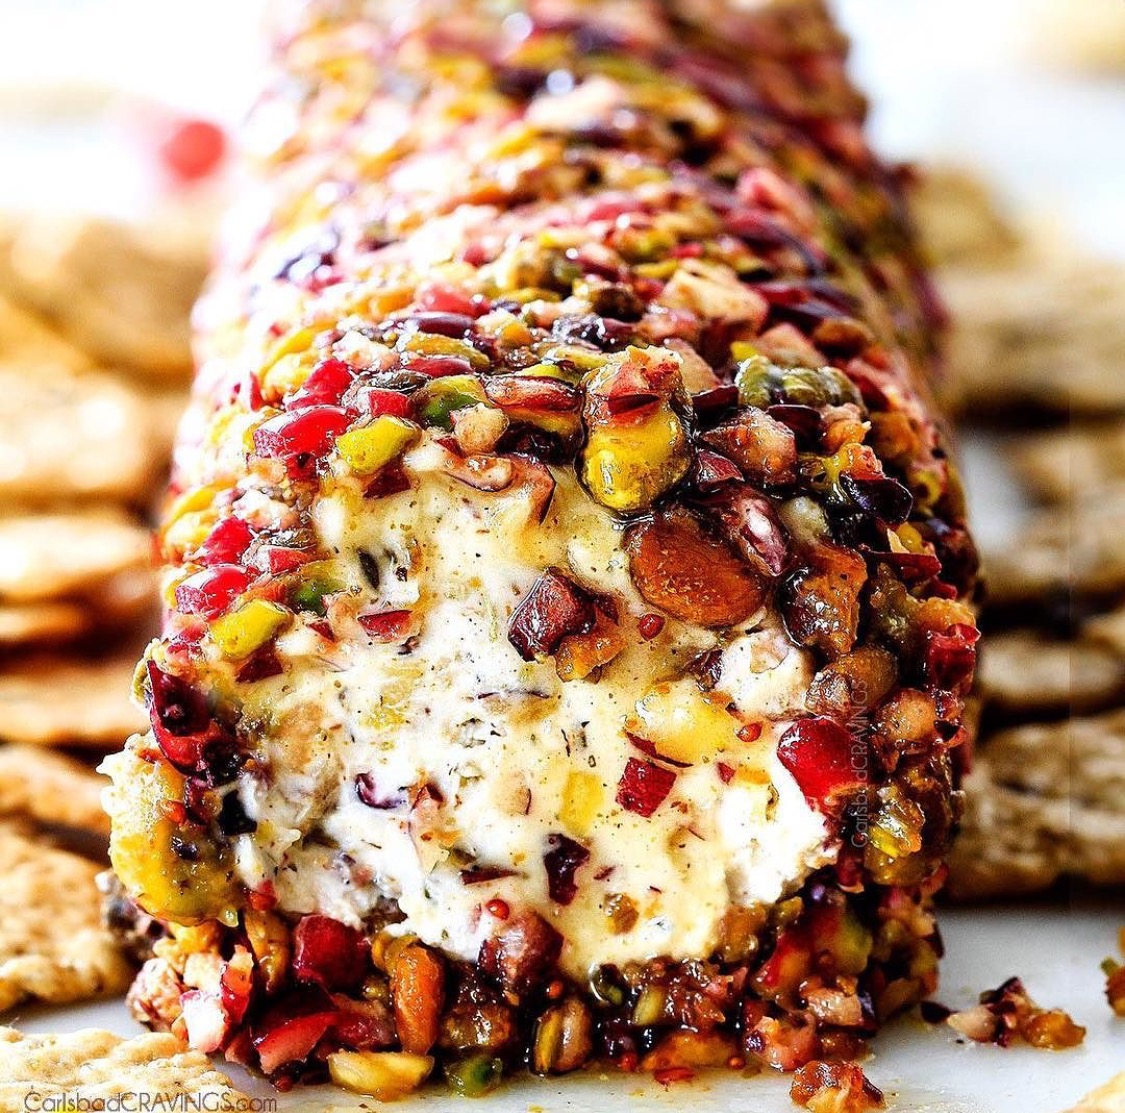
10 minute prep sweet and tangy CRANBERRY PISTACHIO CHEESE LOG is the EASIEST yet most impressive appetizer you will ever make! And it can be made DAYS in advance for stress free entertaining! Serve it with @Crunchmaster crackers for all your gluten free guests! #Crunchmaster Cranberry Pistachio Coating * 1 1/4 cups cranberries * 1 cup shelled pistachios Cheese Log * 7-8 oz. goat cheese log or tub * 4 oz. cream cheese, softened * 1 tablespoon sugar * 1 tablespoon honey * 1/4 tsp EACH ground ginger, ground cinnamon, salt, dried thyme, dried rosemary * 1/8 teaspoon pepper * 1/2 cup Cranberry Pistachio Coating mixture (in directions) Garnish * honey 1. Add cranberries and pistachios to your food processor and chop into small pieces. Remove ½ cup and add it to a medium bowl. Add all remaining Goat Cheese Log ingredients to the bowl and stir to combine. 2. Add this cheese mixture to a large piece of plastic wrap, and form into the shape of a log. Wrap in plastic wrap. Freezer for 20-30 minutes. We want the cheese log slightly firm so it holds its shape but is still soft enough for the Coating to be pressed into it. 3. Line counter with about a large piece parchment paper. Add Coating ingredients to parchment and spread into a single layer square a little larger than the length of the cheese log. Add cheese log to the edge of the Coating and roll in Coating (see photos) until evenly coated, pressing coating into the cheese so it sticks. The cheese log can be refrigerated at this point until ready to serve or serve immediately. 4. When ready to serve, remove from refrigerator 15 minutes beforehand so it can soften. Drizzle generously with honey just before serving. Serve with crackers.
Fresh and crunchy 25 Minute CHINESE CHICKEN SALAD WRAPS
Quick and easy, fresh and crunchy 25 Minute CHINESE CHICKEN SALAD WRAPS are your favorite Chinese salad in easy, portable wrap form! These delectable wraps are loaded with tender rotisserie chicken and crispy vegetables tossed in vibrant dressing all cocooned in soft @flatoutbread slathered with Asian chili mayo! These Wraps are an explosion of flavor and texture for a healthy, satisfying lunch/dinner or grab and go park/picnic/road trip meal! Wraps * 6 Flatout® Flatbreads I use Multi-grain with Flax * 6 romaine lettuce leaves (optional if assembling in advance) Salad Filling * 2 1/2 cups shredded cooked chicken breasts * 3 cups shredded red cabbage * 1 large carrot finely shredded * 1 cup Snow peas ends trimmed and julienned * 1 red bell pepper thinly sliced * 1/4 cup loosely packed cilantro chopped * 1/4 cup chopped green onions Dressing * 3 tablespoons seasoned rice vinegar * 2 tablespoons canola oil * 2-3 tablespoons Asian sweet chili sauce (3 has a little more heat) * 3 tablespoons low sodium soy sauce * 1/2-2 teaspoon sriracha optional * 1 teaspoon sugar * 1/2 tsp EACH salt, ginger, garlic powder * 1/4 teaspoon pepper * 1 tablespoon lime juice (optional)* Asian Chili Mayo * 1/4 cup mayonnaise or yogurt or a combo * 1 tablespoon Asian sweet chili sauce 1. Add all of the Dressing ingredients (except lime juice) to a large bowl and whisk to combine, starting with just a little sriracha and adding more to taste (you can also add more once the salad is added). 2. Add chicken to Dressing and toss to coat while you chop your veggies. 3. Add all of the remaining Salad Filling ingredients to the Dressing and toss until evenly coated. If you are making filling ahead and plan on refrigerating, then add lime juice (as the flavors mellow). If you are serving immediately, then add if you like more tang. 4. Whisk the Asian Chili Mayo ingredients together. Spread the entire surface of each Flatbread with approximately 1 tablespoon Spread. 5. If you are assembling in advance, lay a lettuce leaf in the middle of each flatbread (this will prevent flatbread from getting soggy). Evenly divide Salad Filling between flatbreads in a row on top of lettuce/flatbread. Tightly roll up flatbreads and slice in half. *You can make the Salad filling ahead of time and store in the refrigerator until ready to make wraps. If this is your plan, then I suggest adding the lime juice. **I prefer making the filling ahead of time and refrigerating as the flavors meld beautifully and taste even better the next day. Some water will be released as the Filling is refrigerated, so use tongs to assemble wraps.
HAWAIIAN BURGERS with SRIRACHA MAYO!
If you haven't settled on your Memorial Day menu, and even if you have, it's not too late for these amazingly easy, juicy HAWAIIAN BURGERS with SRIRACHA MAYO! Everyone will thank you. Now just a here’s a few hints, tips and tricks I gleaned from McCormick.com/grill-mates. HOW TO GRILL THE PERFECT BURGER: * Use 80% Lean or 85% Lean meat. Anything greater than 80% lean causes too many flare ups and anything less than 85% lean = dry burgers. * Indent the middle of the patty with your thumb. This allows the meat to cook evenly. * Flip once and NEVER press down. Smashing the burger with your spatula releases all the precious juices which are what make a juicy burger juicy. * For thick burgers, first sear over direct heat, then finish cooking over indirect heat. * For thin burgers (like the ones we are making) stay direct. * Burgers are medium when pink juices come out on top (love this tip!). * My own tip – Baste burgers with your favorite sauce/marinade before adding cheese. We do this with these Hawaiian Burgers. After we flip the burger, we smother in McCormick® Grill Mates® Hawaiian Woodfire Grill Single Use Marinade and then add our Havarti cheese, sealing in that extra layer of saucy deliciousness. Hawaiian Burger Patties * 1 pound 80/20 lean ground beef * 1 large egg * 1/2 cup panko bread crumbs * 1/4 cup chopped red onion * 3 tablespoons McCormick® Grill Mates® Hawaiian Woodfire Grill Single Use Marinade(reserve the rest for later) * 1 teaspoon sriracha * 1 tsp EACH salt, brown sugar * 1/4 teaspoon pepper Hamburger Fixings * 4 hamburger buns * 4 slices pineapple preferable fresh* * 4 slices Havarti cheese (may sub Swiss) * 4 tomato slices * 4 lettuce leaves (I like butter) * bacon optional * avocado optional * olive oil (for grill) Sriracha Mayo * 1/3 cup mayonnaise * 1/2 teaspoon sriracha more or less to taste Hamburger Patties 1. Add egg to a large bowl and gently whisk. Add all remaining Hamburger Patty Ingredients and mix with your hands just until combined, don’t overwork. 2. Form mixture into 4 equal patties roughly the size of your hamburger buns then make a deep impression in the middle of each patty with your thumb (this will help the burgers cook evenly). Refrigerate for 15 minutes. Sriracha Mayo 1. Meanwhile, whisk together the Sriracha Mayo ingredients in a small bowl. Refrigerate. You can also prep your Hamburger Fixings at this time. Pineapple 1. Lightly grease grill/skillet and heat over medium-high heat. Add pineapple and cook 4-5 minutes per side or until softened and grill marks appear. Remove from heat. INDOOR GRILL DIRECTIONS: 1. Heat 1 tablespoon olive oil over medium-high heat in skillet or grease indoor grill. Once hot, add patties and cook until brown and slightly charred on one side, about 4 minutes, flip, reduce heat to medium and cover. 2. Cook an additional 2 minutes and then baste each burger with McCormick® Grill Mates® Hawaiian Woodfire Marinade and top with cheese. Cover and cook an additional 1-2 minutes or to desired doneness. Remove to a plate and tent with foil. OUTDOOR GRILL DIRECTIONS: 1. Grease grill and heat over medium-high heat. Once hot, add patties and cover. Cook until brown and slightly charred on one side, about 4-6 minutes. 2. Flip burgers (but do not press down), and cook an additional 4-6 minutes then then baste each burger with McCormick® Grill Mates® Hawaiian Woodfire Marinade, and top with cheese. Cover and cook an additional 1-2 minutes or to desired doneness. Remove to a plate and tent with foil. Hamburger Buns 1. Add hamburger buns to grill, open side down and toast for about 1 minute or until golden. Remove from heat and spread with desired amount of Sriracha Mayo. Assemble 1. Top buns with lettuce, followed by hamburger patties, pineapple, tomatoes and red onion. Drizzle each burger with desired amount of McCormick® Grill Mates® Hawaiian Woodfire Marinade. Dig in! *If you use canned pineapple, decrease cooking time. .
Pan Asian chimichurri salmon
Introducing Sheet Pan Asian Chimichurri Salmon! wonderfully juicy, tender, and flavorful all baked with crisp tender snap peas and fresh sweet pineapple in ONE PAN for an easy, satisfying meal-in-one that tastes totally gourmet! You will fall in love with this sheet pan wonder! * 4 (6 oz.) salmon fish fillets * 1/4 cup low sodium soy sauce * 1 fresh pineapple chopped into 1” chunks * olive oil * 1 tablespoon brown sugar * 3 cups snap peas, ends trimmed, not snow peas * salt and pepper Asian Chimichurri * 3/4 cups fresh cilantro leaves and stems packed * 1/4 cup fresh basil leaves packed * 1/4 cup fresh mint leaves packed * 2 garlic cloves peeled * 1/2 inch piece ginger peeled, roughly chopped * 2 green onions roughly chopped * 1 jalapeno deveined seeds separated, roughly chopped Add later: * 1 1/2 tablespoons olive oil * 1 tablespoon quality hoisin sauce (Lee Kum Kee or Kikkoman) * 1 tablespoon rice wine vinegar * 1/2 tablespoon fish sauce (may sub soy sauce) * 1/2 tablespoon lime juice * 1/8 teaspoon EACH salt and pepper * 1/8 teaspoon pepper 1. Add cilantro, basil, mint, garlic, ginger, green onions, and jalapeno (without seeds) to food processor and pulse until coarsely chopped, pushing sides down as needed. Add olive oil, hoisin sauce, rice wine vinegar, fish sauce, lime juice, salt and pepper and continue to pulse until finely chopped and well combined. If you like more heat, add some jalapeno seeds to taste. Marinade 1. Remove ½ cup chimichurri to a shallow large bowl/dish or large freezer bag and whisk together ¼ cup soy sauce. Add salmon and marinate 30-60 minutes at room temperature. Meanwhile you can prep your pineapple/snap peas. Bake 1. When read to bake, preheat oven to 400 degrees F. Line baking sheet/jelly roll pan with foil and spray with cooking spray. Add pineapple, 1 tablespoon brown sugar and one tablespoon olive oil and toss to coat. Bake 5 minutes. NOTE: I used a large jelly roll pan but everything will fit on a baking sheet - it will just be snug. 2. Remove from oven and add snap peas. Toss peas with 1 tablespoon olive oil, 1 tablespoon chimichurri. 1/4 teaspoon salt and 1/8 teaspoon pepper. Push pineapple and snap peas to one side of the pan. Dab excess marinade from salmon with paper towels and add to pan with pineapple and snap peas. 3. Bake at 400 degrees F for approximately 12-16 minutes or until salmon is cooked through and flakes easily with a fork (cooking time may vary depending on thickness of salmon, see note)* Broil salmon and veggies for 1-2 minutes or until salmon is golden. Spoon additional Chimichurri over salmon if desired (taste first). **Cooking time will vary depending on the size and thickness of your salmon fillets. Roast until the salmon is cooked through and flakes easily, 4 to 6 minutes for every 1/2-inch thickness of salmon. An instant-read thermometer into the thickest part of the fillet should read 120°F to 130°F for medium-rare or 135°F to 145°F for more well-done.
30 MINUTE KUNG PAO SHRIMP!
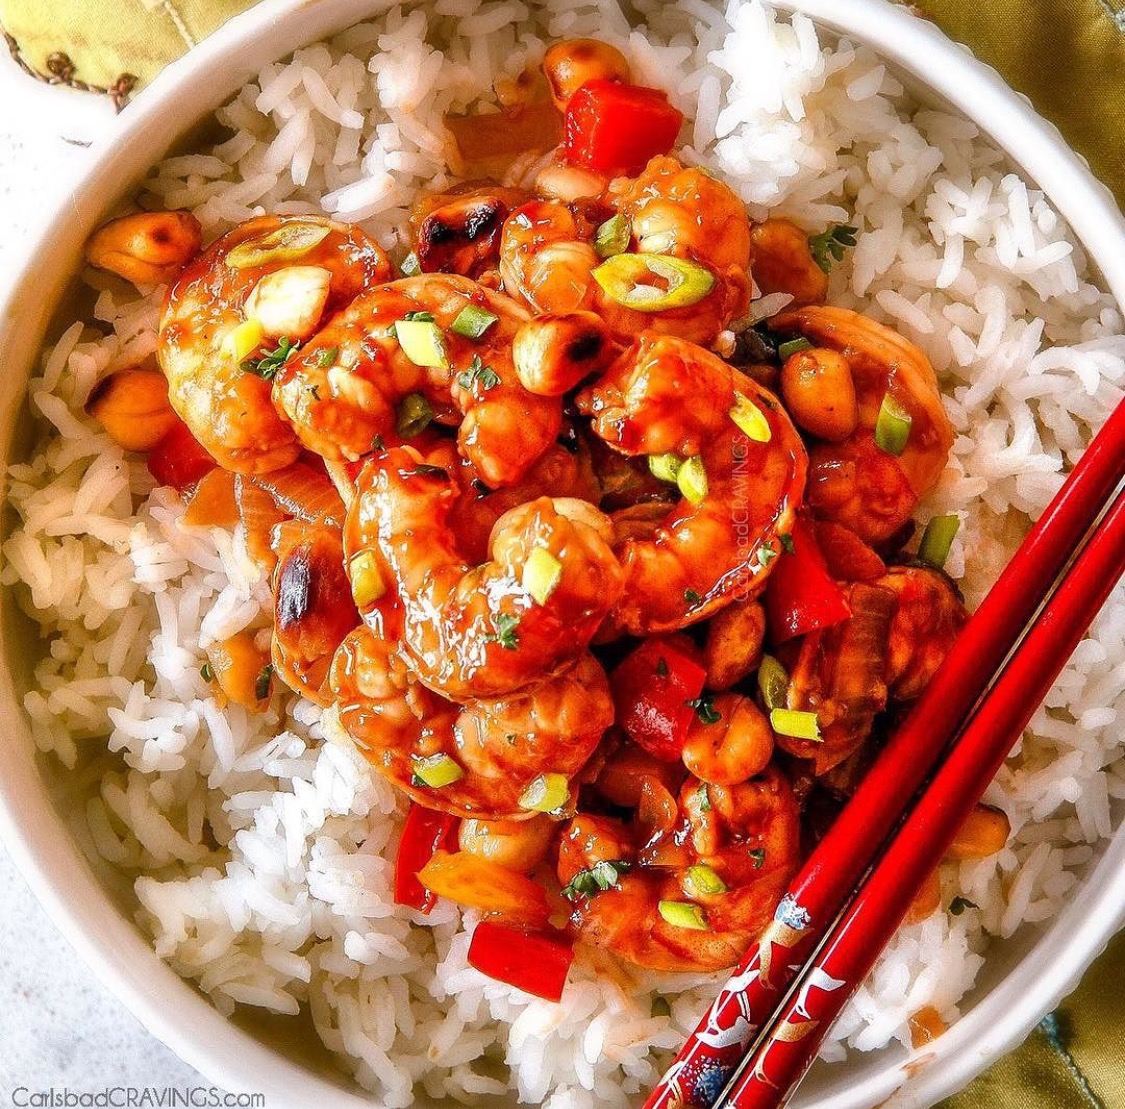
30 MINUTE KUNG PAO SHRIMP! this easy, healthy fakeout takeout tastes better than any restaurant and is on your table in less than 30 minutes! You will love combination of juicy shrimp and crunchy peanuts in the savory, fiery garlic chili sauce with CUSTOMIABLE heat!⠀ * 1 pound large shrimp peeled, deveined, tails off Sauce/Marinade * 1/4 cup low sodium soy sauce * 1/4 cup mirin (may sub dry sherry) * 1/4 cup rice vinegar * 2 tablespoons hoisin sauce * 1 tablespoon brown sugar * 2-3 tablespoons red chili paste* * 1 teaspoon sesame oil * 1/2 teaspoon pepper Add later: * 1/4 cup water * 1 tablespoon cornstarch Stir Fry * 1 cup salted dry roasted peanuts * 1 tablespoon olive oil * 2 bell peppers, chopped (any combo of colors) * 1/2 onion, chopped * 2 teaspoons freshly grated ginger * 4-6 garlic cloves, minced 1. In a medium bowl, whisk together marinade/sauce ingredients EXCEPT water, and cornstarch. Add 1/3 cup of the marinade/sauce to a large freezer bag with shrimp. Let marinate at room temperature while you prep your veggies, or up to 30 minutes. To the remaining sauce, whisk in 1/4 cup water and cornstarch. 2. Meanwhile, in a large skillet, dry roast peanuts until golden, tossing occasionally, approximately 3 minutes. Set aside. 3. Heat 1 tablespoon olive oil in a large nonstick skillet over medium high heat. Once hot, add onion and sauté 3 minutes. Add bell peppers, garlic and ginger and continue to stir fry 2 additional minutes. 4. Add shrimp and stir fry just until opaque, about 2-3 minutes (don't overcook!). Add reserved sauce to skillet and simmer until sauce thickens, approximately 1-2 minutes. Taste and season with additional salt and/or pepper, red chili paste for spicier or sugar for sweeter if desired. 5. Garnish individual servings with peanuts and optional green onions. Serve with rice. *If you aren’t sure how much to add, I would start with less and add more to taste – you can add more heat but its hard to take it away!
How to roast the JUICIEST, MOST FLAVORFUL TURKEY EVER
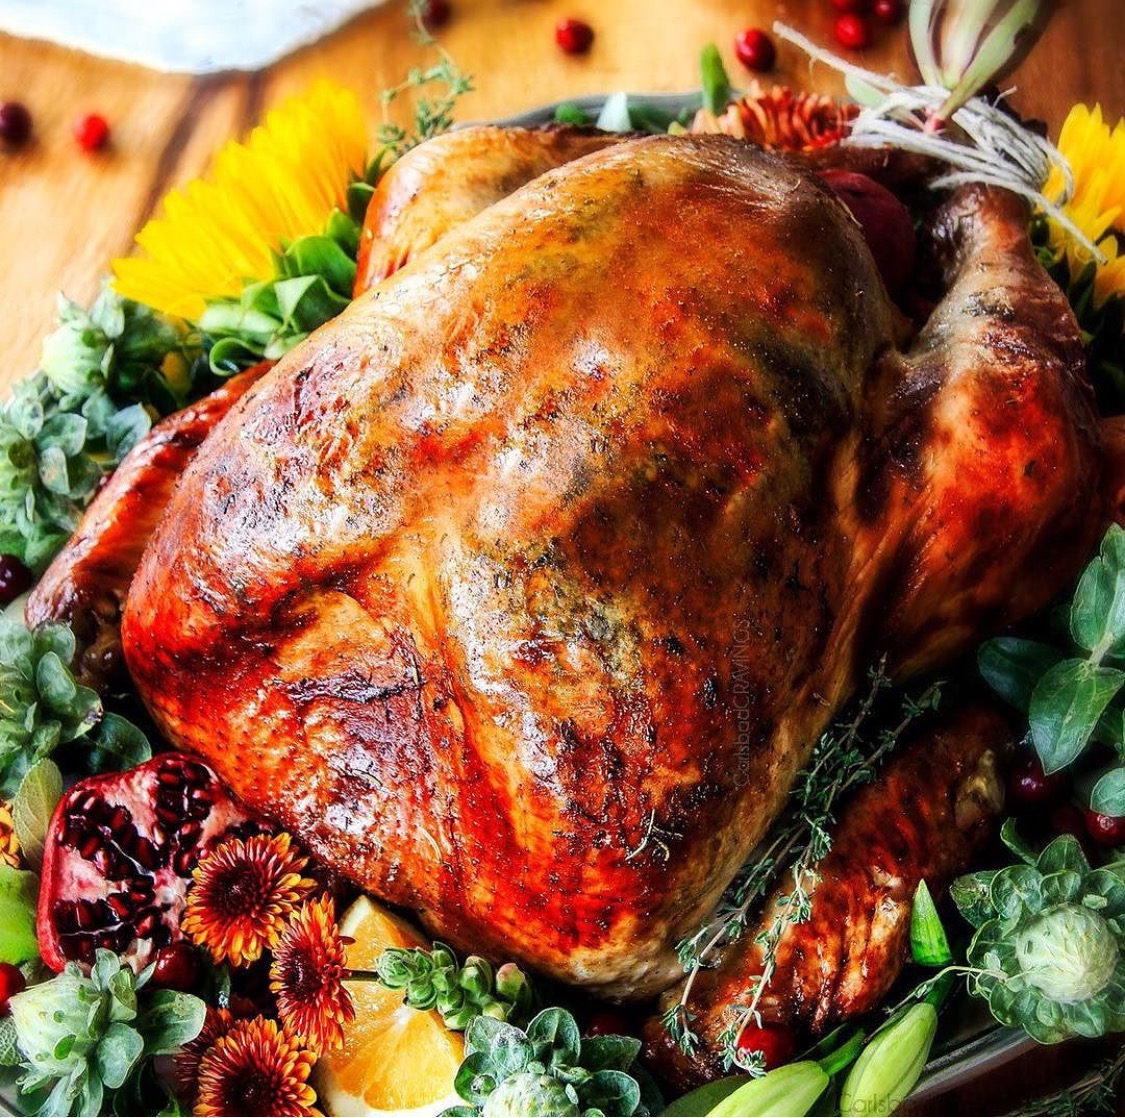
My tip for decorating your turkey- buy a bouquet of Fall flowers and place it around the bird with a few pomegranates- viola! And if you are cooking turkey this year and want to learn how to roast the JUICIEST, MOST FLAVORFUL TURKEY EVER (which means the best gravy!) then I've got you covered with a detailed guide on How to Roast Turkey perfectly every time! So even if you have never made turkey before, you can be the hero of Thanksgiving with this brined, herb butter infused turkey! ⠀ ⠀ ⠀ ⠀WHAT TURKEY TO BUY? First of all, what turkey size will feed your crowd? A general rule of thumb is 1½ pounds per person. So for 8 people, buy a 12-pound turkey. Of course there are variables in this calculation such as kids, big/small eaters, but in general, if you plan on 1 1/2 pounds/person you will be safe. Now what type of turkey? For this roast turkey recipe we are brining our turkey (more on that below), so we want a specific turkey – FRESH, NEVER FROZEN. Some turkeys are frozen then thawed at the store so check the label for “previously frozen” – we don’t want that. Frozen turkeys are almost always injected with a sodium solution. This, combined with brining, will make your turkey too salty. We also don’t want kosher, self-basting and pre-brined turkeys because they either have been salted or have been injected with broth, salt, seasonings, and/or other flavorings. By using this type of turkey, you’ll also end up with an overly salted and dried out bird. So keep it fresh! HOW TO THAW YOUR TURKEY We don’t want to use a frozen turkey for brining but if you already have purchased your frozen turkey, then just be sure to cut the salt in the brine IN HALF. If your turkey is frozen, don’t make the mistake of waiting until Thanksgiving to thaw your turkey – or even waiting a few days before. Frozen turkeys take at least 3 days to thaw in the refrigerator – and our brine takes a day – so plan accordingly. It’s much better to give yourself too much time than not enough. The safest and most convenient way to thaw your turkey is in the refrigerator. Place turkey on a roasting rack in a roasting pan. This will catch any juices/water from the packaging. As a rule of thumb, your turkey will need AT LEAST 24 hours for every five pounds. So, if you have a 15 pound turkey, plan on 3 solid days for defrosting, 1 day for brining and 1 day for caution, as it’s better to have a little wiggle room. A defrosted turkey is completely safe in your refrigerator for a couple days. HOW TO BRINE YOUR TURKEY To brine, we combine vegetable broth, sea salt (NOT kosher or table salt or it will be WAY too salty), brown sugar, garlic, rosemary, sage, paprika, thyme, peppercorns, bay leaves and peels from 2 oranges in a large stock pot and bring to boil in order to dissolve the salt and sugar. Next, remove from heat, stir in apple juice and cover and let brine cool to room temperature. You can place in the refrigerator to speed up the process. Next, place your turkey in a large brining bag. There are actual Brining Bags that I have seen at Bed, Bath and Beyond, but I used I use Reynolds Oven Bags, Turkey Size, for meats/poultry 8-24 lbs. These bags are typically located in the grocery aisles near the cooking utensils/disposable foil pans. I highly recommend double bagging your turkey in case the bag punctures and leaks – as happened to me before – fortunately, my turkey was on a large baking tray – phewy. Once your turkey is in the bag, pour the cooled brine over the turkey then stir in ice water. Make sure the brine fills the cavity of the turkey and covers the turkey by squeezing out any excess air in the bag. If your brine needs more liquid, top it off with equal amounts vegetable broth and apple juice. It is helpful to place the bag in another container to push the liquid up around the turkey. The easiest method I have found is to place my bag in a 5 gallon Home Depot bucket and then add my turkey to the bag, add my brine and ice water, seal up the bag, then weigh it down so the turkey doesn’t float and refrigerate. If your refrigerator space is limited, the vegetable drawer can be a good option to place your bagged, brining turkey. If the brine doesn’t cover the turkey when placed on its side, be sure to flip the bag every so often. You can also place the brining turkey in a cooler and surround it with ice packs, taking care to flip/rotate every so often, just take care to maintain a temperature above freezing but below 40 degrees to stay out of the bacteria growing “danger zone.” The turkey gets brined in the refrigerator/cooler for 16-24 hours. The general rule of thumb is 1 hour per pound. When ready to remove turkey from brine, place it in the sink and cut the bag. Now, thoroughly rinse the turkey, including the cavity, with cool water for at least 5 minutes to get rid of excess salt. Next, place your turkey on a roasting rack set in a roasting pan and thoroughly pat dry with paper towels. Place turkey in the refrigerator for at least 30 minutes, however, I highly recommend leaving it in the refrigerator overnight in order for the skin to dry out which means crispier skin during roasting. HOW TO APPLY HERB BUTTER Our brined turkey will be wonderfully moist with flavor trapped inside the bird, but now it’s time to take it the next level – the best-roast turkey-I’ve-ever-eaten-level with Herb Butter. Herb Butter moistens the turkey, infuses it with flavor and helps promote that beautifully golden skin – and literally takes minutes to whip up! To make our herb butter, simply whisk together softened butter, olive oil (to prevent the butter from burning), a splash of Dijon and soy sauce, and plenty of seasonings: garlic powder, dried rosemary, dried parsley, dried thyme leaves, onion powder, paprika, pepper, ground cumin. The butter is multi-dimensional, flavorful and balanced. If you have never used herb butter under the skin of a turkey before, don’t be intimidated, it is quite easy once you just go for it. The easiest method I have found is to come at the turkey from 4 different areas – from each breast from both the top and from the bottom. First, gently loosen the skin on the breasts starting at the large cavity end by gently running your fingers between the skin and the meat, taking care not to tear the skin. Loosen the skin about halfway back then rotate the bird and repeat from the neck end until all the breast skin is loosened. Place 2 tablespoons of the softened butter under the skin of each breast and gently press on the skin to spread the butter evenly over half of each breast. Rotate bird and repeat using 2 tablespoons per breast again so the entire breast is covered in butter. Spread half of the remaining butter over the turkey including drumsticks and wings. Flip turkey over so it is BREAST SIDE DOWN and spread the remaining butter over the turkey. Hello flaaaaaaaavor! ROASTING YOUR TURKEY Now it’s almost time to roast our turkey – they easiest, hands-off part of the process. First, we want to stuff the cavity of our bird with aromatics. I use a quartered orange, onion and apple which not only add moistness but flavor as well. There really is no right or wrong here – many people add carrots, celery, fresh thyme, rosemary, etc. but I did not find that necessary due to the herb butter. We want to roast our turkey on a rack placed inside a roasting pan which is essential to elevate the meat to promote even cooking and browning. Next, place 2 cups chicken broth on the bottom of our roasting pan to enhance moistness and flavor. We will add more water about halfway through roasting as it evaporates so we will have plenty of broth for our incredibly flavorful gravy. We use additional water as opposed to chicken broth to ensure our gravy isn’t too salty because you can always add salt but it’s hard to take away. We start cooking our roast turkey with the breast SIDE DOWN because dark meat needs to cook for a longer period than the top white meat and this help to protect our delicate breast meat from overcooking/becoming dry and instead remains wonderfully juicy. We flip our turkey after 45 minutes and reduce heat from 400 to 350 degrees. Cooking at slightly higher temperature initially gives the turkey a crisp skin, while lowering the temperature for the remaining cooking time prevents the turkey from drying out. As far as flipping the turkey goes – it really is quite simple. For this latest roast turkey, I used an 18 pounder and had no problem flipping it. Simply use two wads of paper towels to grasp the bird on each end. This protects you from the heat and give you plenty of traction. Now the question to baste or not to baste? I baste my roast turkey a few times initially but stop basting about halfway through cooking so the skin can crisp up. If you continue to baste, your skin won’t be crispy and can even become soggy. If you want extra crispy skin, don’t baste at all! TURKEY COOKING TIME As far as cooking time, you NEED an instant read meat thermometer. You can pick these up at your local grocery store, Target, Walmart – most places should carry them. A meat thermometer is essential because there is no accurate way to know if the turkey is cooked through – and not overcooked (almost as important)– without a meat thermometer due to many variables such as size of your turkey, how long you brined your turkey, how long rinsed brined turkey sat in refrigerator, how cold your turkey is, how often you open your oven, etc. Brined turkeys cook much faster than not brined turkeys so rely on your meat thermometer. The roast turkey should be cooked until it reaches 160°F and then removed from the oven. To test the temperature, insert a thermometer into the thickest part of the breast. Here is a GENERAL guideline on cooking times by the pound for BRINED TURKEY in a conventional oven. If you have a convection oven, cooking times will be much quicker: GENERAL COOKING TIMES FOR BRINED TURKEY Weight Total Roasting Time 8-12 pounds-1.5 to 2 hours 12-16 pounds -2 to 3 hours 16-20 pounds -2.5 to 3.5 hours 20-25 pounds -3 to 4 hours REST YOUR TURKEY After we remove our roast turkey from the oven, we need to let it rest for 20-30 minutes UNCOVERED – so the skin doesn’t get soggy. While the turkey cooks, the juices are forced away from the heat to the middle of the turkey. The resting time allows for the redistribution and reabsorption of the juices throughout the whole turkey. HOW TO MAKE THE BEST GRAVY While your roast turkey is resting, it’s the perfect time to make your gravy – the icing on the “cake!” To make our EASY, beautiful, amazingly flavorful gravy, we first want to skim off the fat because nothing is as unappetizing at turkey dinner than fat that separates from your gravy while you pour and eat. The easiest way to do this is by pouring the contents (drippings and liquid) of the roasting rack into a degreasing cup with a spout. If you don’t have a degreasing cup, no fear! You can still separate the fat by adding the drippings/liquid to a large freezer bag and allowing the fat to separate to the top. Next, seal the bag and hold over a 4+ cup measuring cup so that one bottom corner tip is facing down into the measuring cup like a spout. Make a small cut in this corner with scissors. The bottom liquid will flow through the cut made into the bag without the fat and into the large measuring cup. Stop when you reach 4 cups or the fat. Eazy peazy! Next, melt some unsalted butter with one tablespoon reserved Herb Butter. After we have melted our butter, we whisk in flour and cook, whisking constantly for 5 minutes. Next, we slowly whisk in 4 cups of our degreased turkey drippings/liquid. The turkey drippings are the deeply flavorful rich scrapings from the bottom of the roasting pan and boast concentrated flavor that translates into the best gravy on. the. planet. It’s so concentrated, in fact, that’s why we use water instead of additional chicken broth while roasting. Water also ensures that our broth won’t be too salty because the salt contents can vary depending on how much salt dripped off the skin – and you can always add salt, but you can’t take it back! Let the gravy simmer until thickened, about 25 minutes which just happens to be the same amount of time your turkey needs for resting. Now taste and add additional Herb Butter (you will have one tablespoon left) if you want even moreflavor and season with salt and pepper to taste. Now let’s eat! ⠀ ⠀
ROASTED BUTTERNUT SQUASH SALAD WITH CRANBERRIES, CARAMELIZED PECANS AND GOAT CHEESE
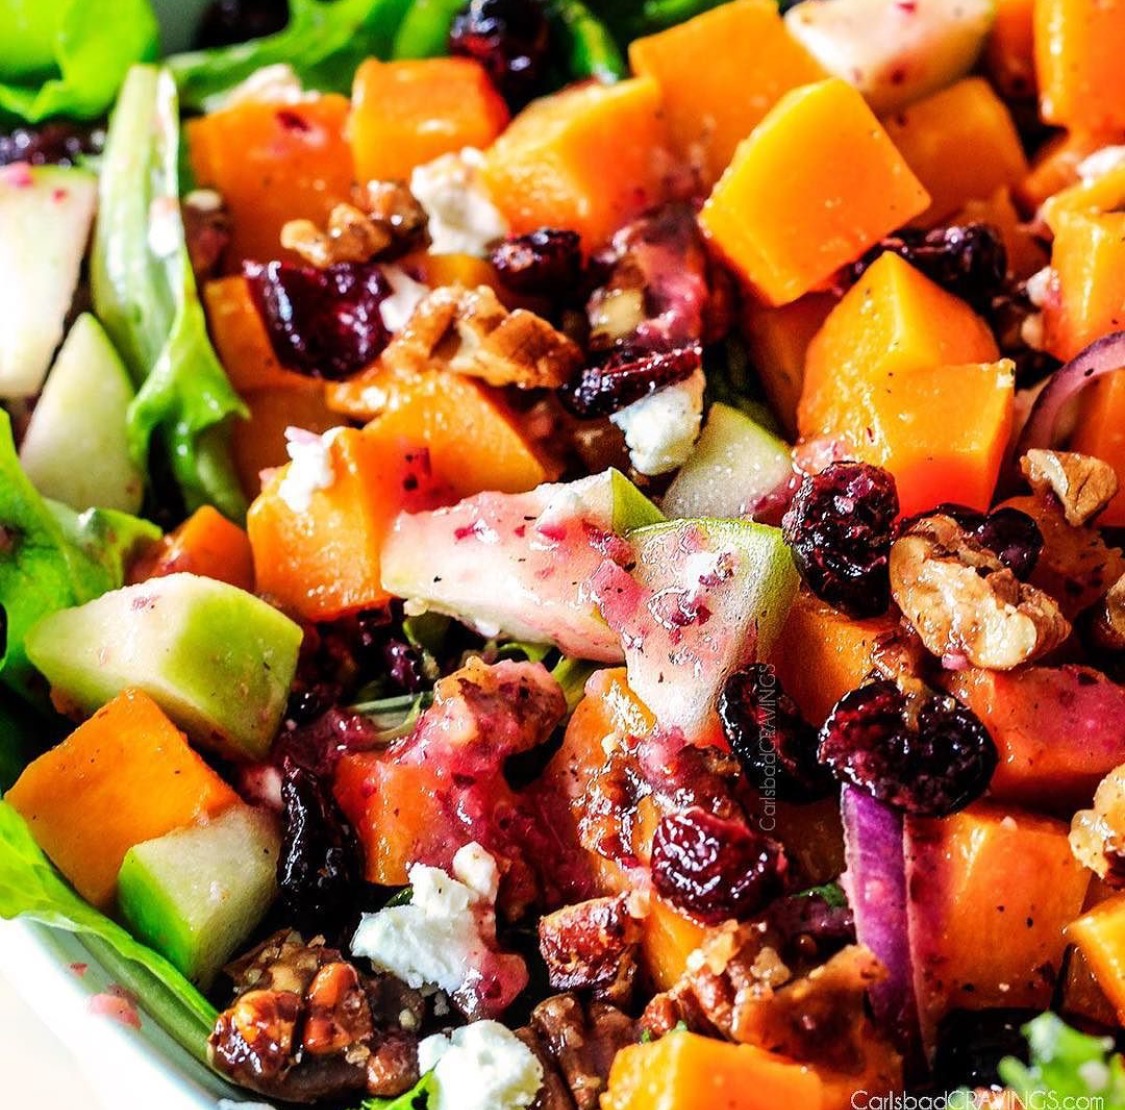
This ROASTED BUTTERNUT SQUASH SALAD WITH CRANBERRIES, CARAMELIZED PECANS AND GOAT CHEESE all drizzled with the most incredible CRANBERRY VINAIGRETTE belongs on your table this Thanksgiving and Christmas and all season long! You are probably going to want to volunteer to bring salad to Thanksgiving this year because this salad is make ahead, stress free perfection. I loved this salad so much it was gone within 24 hours – and I was the only one home.!⠀ ⠀ Prep Time 30 minutes Cook Time 15 minutes INGREDIENTS Roasted Butternut Squash * 1 butternut squash (1 1/2-pounds) peeled and chopped into 1/2-3/4” cubes * 2 tablespoons olive oil * 1 tablespoon pure maple syrup * 1/4 teaspoon salt * 1/8 teaspoon pepper * Dash of cayenne Salad * Roasted Butternut Squash from above * 12 oz. spring salad mix * 1/2 red onion, thinly sliced * 1 Granny Smith apple, chopped * 1 cup dried cranberries/craisins * 4 oz. soft crumbled goat cheese * 1 Recipe 5 Minute Perfect Caramelized Nuts Cranberry Vinaigrette * 1/2 cup fresh cranberries * 1 garlic clove, peeled * 1 small shallot, peeled * 2 tablespoons sugar, more or less to taste * 1 tablespoon Dijon mustard * 1/4 cup red wine vinegar * 3/4 cup olive or canola oil * 1/2 teaspoon pepper * 1/2 teaspoon salt ⠀ ⠀ ⠀Cranberry Vinaigrette 1. Add cranberries, garlic clove and shallot to food processor and chop fine. Add sugar, Dijon, red wine vinegar, oil, salt and pepper and process until smooth. 2. Refrigerate Vinaigrette while you prepare the salad ingredients then whisk/shake again before drizzling over salad. The Vinaigrette is best if allowed to chill at least one hour in advance. Vinaigrette can a be made ahead of time and stored in the refrigerator for a couple days. Caramelized Pecans 1. Prepare according to directions. Can be made, cooled then stored in an airtight container for up to one week before using. Butternut Squash 1. Preheat the oven to 400 degrees F. 2. Add butternut squash to a foil lined baking sheet (for easy cleanup). Add olive oil, maple syrup, salt, pepper, cayenne and toss until evenly coated. Roast for 15-20 minutes, turning once, until tender. Assemble 1. When ready to serve, toss all of the salad ingredients together in a large bowl. You can either drizzle with desired amount of dressing and toss to combine or if you expect leftovers, drizzle individual salad servings with dressing. You can prepare all of the salad ingredients days in advance (except the apple) and keep them separate in airtight containers in the refrigerator (except nuts - keep at room temperature in an airtight container) until ready to serve so your salad can come together in minutes. All ingredients are a guideline. Add more or less of your favorite salad fixings! ⠀
Juicy, smoky, sweet and tangy, MESQUITE PINEAPPLE BBQ CHICKEN
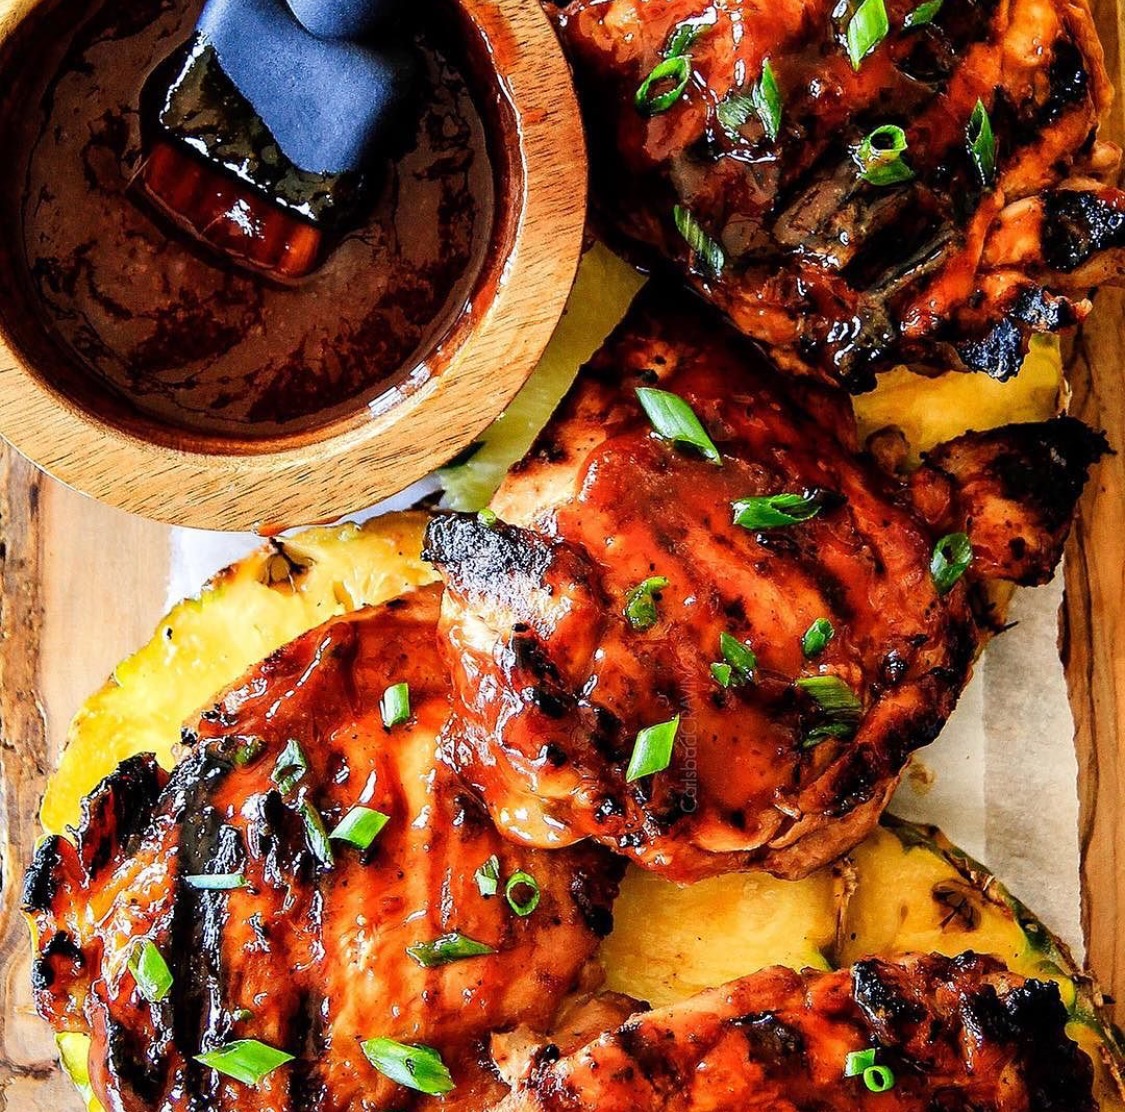
This Juicy, smoky, sweet and tangy, MESQUITE PINEAPPLE BBQ CHICKEN smothered in the most wonderful homemade Pineapple BBQ sauce is irresistibly delicious! It’s fabulously easy thanks to @mccomrick Mesquite seasoning and makes the perfect make ahead dinner or barbecue. Prep Time 15 minutes Cook Time 12 minutes Servings. 6 people INGREDIENTS * 2-3 pounds bone-in skinless chicken thighs * 3 tablespoons olive oil Pineapple BBQ Sauce * 1 cup roughly chopped fresh pineapple * 1/2 cup ketchup * 1/4 cup packed brown sugar * 3 tablespoons molasses * 1-2 tablespoons cider vinegar depending on how tangy you want it and how tart/sweet your pineapple is * 1 teaspoon Dijon mustard * 1 tablespoon McCormick® Grill Mates® Mesquite Seasoning * 1/2 teaspoon ground ginger 1. Add all of the Pineapple BBQ Sauce ingredients to your blender and blend until smooth. Remove 1/4 cup Sauce to freezer bag along with 3 tablespoons olive oil. Add chicken and toss until evenly coated. Refrigerate 2-6 hours. 2. Refrigerate remaining Pineapple BBQ Sauce separately. Heat in microwave/saucepan before serving. GRILL 1. Separate out a 1/4 cup Pineapple BBQ Sauce to baste chicken. Set aside. 2. Grease and heat grill to medium heat. Add chicken, and season with freshly cracked salt and pepper. Cover, and cook 6-8 minutes per side, or until no longer pink and an inside thermometer registers 165 degrees F. Baste chicken with reserved 1/4 cup Sauce the last 5 minutes. 3. Slather cooked chicken with Pineapple BBQ Sauce and garnish with green onions if desired. Serve with remaining sauce and additional salt/pepper if desired. STOVETOP/OVEN 1. Separate out a 1/4 cup Pineapple BBQ Sauce to baste chicken. Set aside. 2. Preheat oven to 350 degrees F. Season chicken with freshly cracked salt and pepper. 3. Heat one tablespoon olive oil over medium high heat. Add chicken and sear 2-3 minutes per side. 4. Add chicken to a foil lined, greased 9x13 pan (for easy cleanup), COVER with foil, and bake for 30 minutes. Remove foil cover, baste with 1/4 cup reserved Sauce and continue to cook, uncovered an additional 15-20 minutes OR until an inside thermometer registers 165 degrees F at the thickest part of the chicken. 5. Slather cooked chicken with Pineapple BBQ Sauce and garnish with green onions if desired. Serve with remaining sauce and additional salt/pepper if desired. ⠀
GREEK CHICKEN SALAD loaded with PITA CROUTONS and TZATZIKI DRESSING!
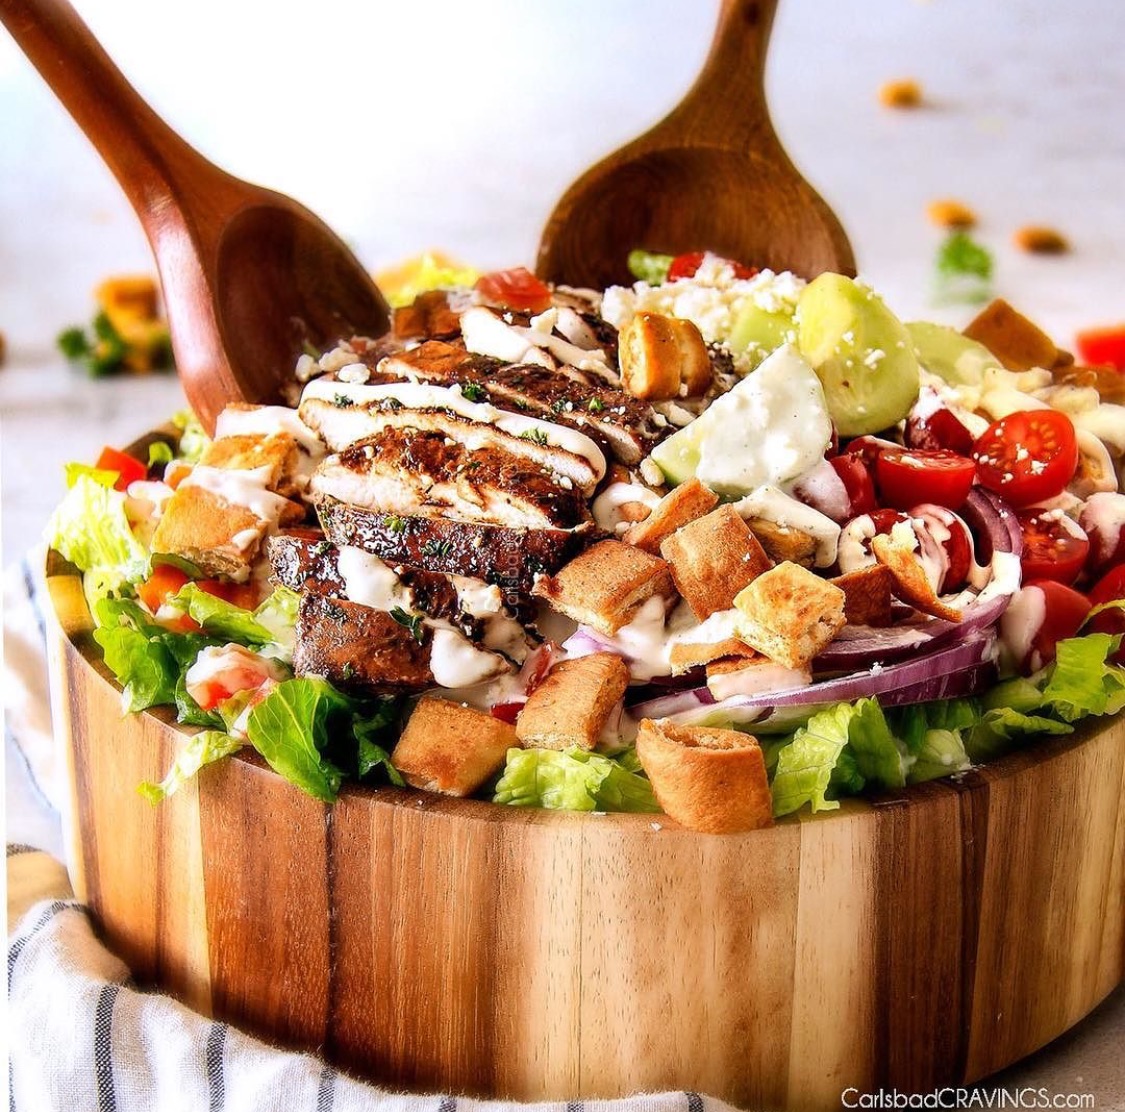
I am pretty sure I found your new obsession - GREEK CHICKEN SALAD loaded with PITA CROUTONS and TZATZIKI DRESSING! Its like a deconstructed gyro you will crave for days AND you don't have to feel guilty about satisfying your cravings because the creamy, tangy, otherwordly dressing is made with Greek yogurt and @kraftrecipes NEW Avocado Oil Mayo! Its the healthier positively DELISH mayo you have been waiting for! ⠀ ⠀ Tzatziki Dressing * 1/2 medium cucumber, peeled * 1/2 teaspoon salt * 3/4 cup plain Greek yogurt (preferably whole or 2%) * 1/4 cup KRAFT Avocado Oil Mayo * 1/4 cup sour cream (may sub yogurt) * 1 tablespoon olive oil * 1 garlic clove, peeled * 1 teaspoon lemon juice * 1 teaspoon red wine vinegar (may sub white) * 1/2 tsp EACH dried dill, dried parsley * 1/8 teaspoon pepper, ground cumin Salad * 1 head romaine lettuce, chopped * 1 cucumber peeled, cut in half lengthwise, then cut into 1/2” chunks * 8 oz. cherry or grape tomatoes halved * 1 red bell pepper, chopped * 1/2 red onion very thinly sliced * 1/4 cup pitted Kalamata olives sliced if desired * 1/4 cup crumbled feta cheese Easy Pita Croutons * 4 plain pita breads cut into 1/2-1” squares (roughly 4 cups) * 3 tablespoons olive oil * 1/8 tsp EACH salt, garlic pwder, paprika Greek Chicken 1. Prepare chicken according to recipe directions. You can cook chicken in advance and serve cold or cook while preparing Pita Croutons and serve warm according to personal preference. Blender Tzatziki Dressing 1. Meanwhile, slice cucumber in half lengthwise and scrape out the seeds using a teaspoon (see picture in post). Chop cucumber and add to a fine mesh sieve and sprinkle with ½ teaspoon salt. Stir and let sit 15 minutes. 2. After 15 minutes, use the back of a spoon to push cucumber down against sieve to release excess water. Repeat several times. 3. Add cucumber along with all remaining Tzatziki Dressing ingredients to a blender and blend until smooth. Add milk, a teaspoon at a time if needed to reach desired consistency. Refrigerate (Best if chilled at least 1 hour, the longer the better.) Dressing with thicken upon standing. Season with salt and pepper to taste before serving. Pita Croutons 1. Preheat oven to 400F degrees. Add pita squares to a baking sheet and drizzle with olive oil. Season with salt, paprika and garlic powder. Toss until evenly coated then spread into an even layer on baking sheet. Bake for 10 minutes or until golden. Assemble 1. Add Salad ingredients to a large bowl and toss to combine (or create a salad bar). Top with Greek Chicken. If you don't expect leftovers, top with Pita Croutons and desired amount of Tzatziki Dressing . If you are expecting leftovers, then serve Pita Croutons and Tzatziki Dressing separately with individual servings. Enjoy! .
LOADED ZUPPA TOSCANA
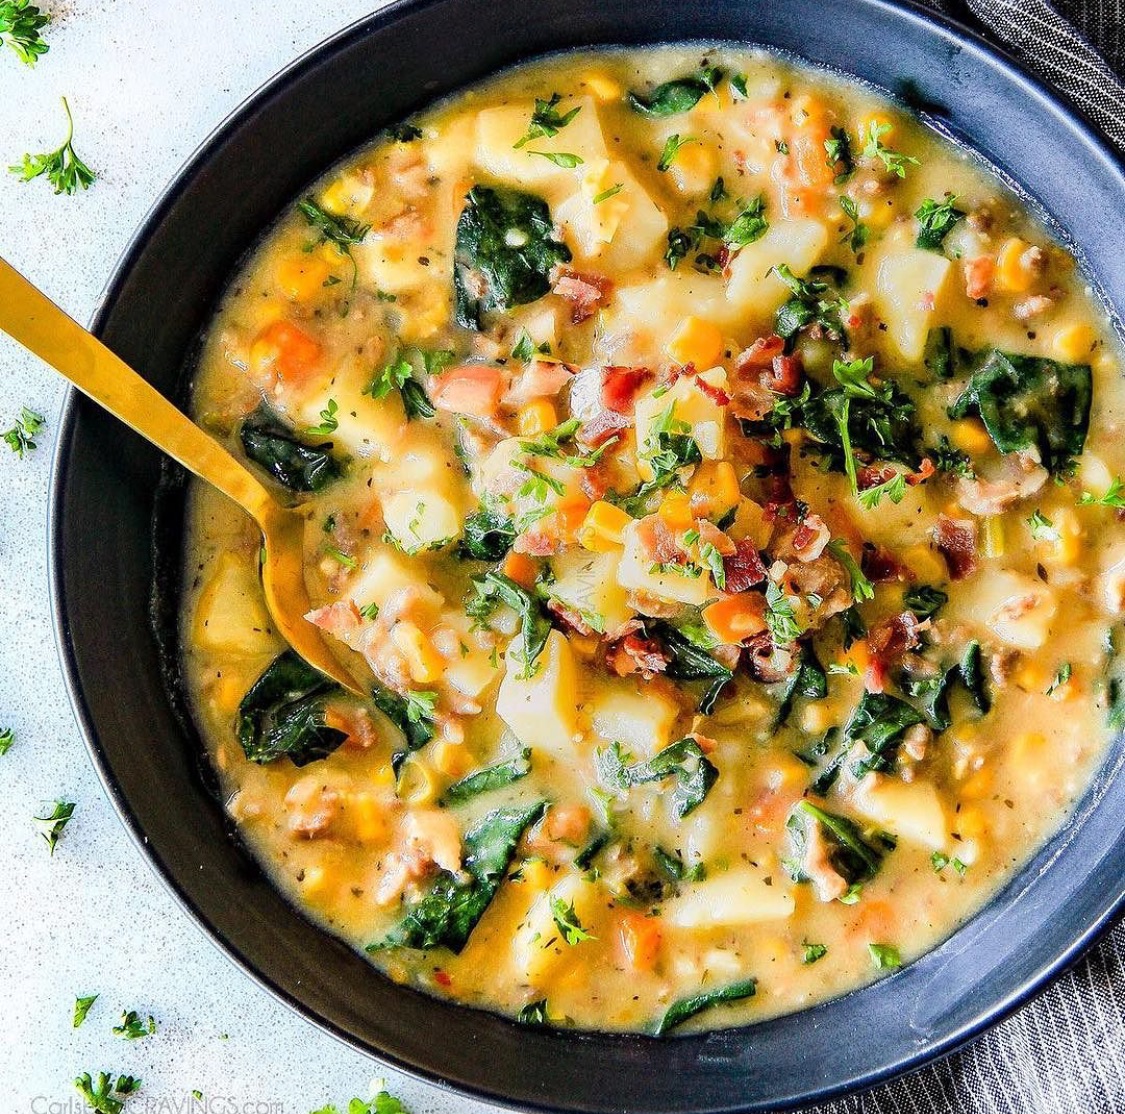
This LOADED ZUPPA TOSCANA is the ultimate creamy, hearty, decadently delicious comfort food! It truly tastes better than Olive Garden’s version loaded with Italian sausage, potatoes, bacon, cannellini beans, carrots, corn, and kale/spinach!⠀ * 6 slices bacon uncooked * 1 pound bulk/ground spicy Italian sausage * 1 onion, chopped * 3 carrots, chopped (approx. 1 ½ cups) * 3 stalks celery, chopped (approx. 1 ½ cups) * 4-6 garlic cloves, minced * 1/3 cup flour * 1 1/2 pounds/3 medium russet potatoes chopped into bite size cubes * 1 15 oz. can cannellini beans rinsed and rained * 1 15 oz. can can sweet corn rinsed and drained * 1 15 oz. can creamed corn * 4 cups low sodium chicken broth * 3 cups milk * 3 tablespoons cornstarch * 1 tablespoon Dijon mustard * 2 bay leaves * 1 tablespoon chicken bouillon * 1 tsp EACH dried parsley, salt * 1/2 tsp EACH dried basil, dried oregano * 1/4 tsp EACH dried thyme, pepper * 1/4 teaspoon red pepper flakes, or more to taste (optional if you like heat) Add later: * 2-3 cups half and half * 4 cups loosely packed fresh chopped spinach or kale Garnish (optional) * remaining bacon in directions * fresh parsley * Parmesan cheese 1. Cook bacon in Dutch oven/large stock pot until crispy; remove from pot. Drain all but 2 tablespoons bacon grease or add additional olive oil to equal about 2 tablespoons. 2. Add onions, carrots and celery and sauté for 5 minutes over medium heat. Increase heat to medium high and add sausage and garlic and cook, while crumbling meat, until meat is browned, about 3 minutes. Sprinkle in flour and cook, while stirring, an additional 2 minutes. 3. Turn heat to low and stir in potatoes, cannellini beans, creamed corn and sweet corn. Add chicken broth. Whisk cornstarch with milk (you can whisk with as little as 1 cup milk, just enough so it dissolves) and add to pot. Stir in Dijon, bay leaves and all seasonings. 4. Increase heat to high, cover pot and bring to a boil. Remove lid and reduce heat to a gentle simmer until potatoes are fork tender, about 15 minutes, stirring occasionally. 5. Stir in half half and half, adding additional half and half or broth if desired for a less “chunky” soup and warm through. 6. Remove from heat and stir in spinach/kale and half of chopped bacon. 7. Garnish individual servings with remaining bacon and Parmesan cheese if desired. ⠀ ⠀ ⠀